
在使用 Google Search Console 時,發現 Google 無法找出文章的結構化資料,原來是所使用的 Pelican-bootstrap3 主題樣板沒有設定正確的標記,為了讓部落格文章可以被搜尋引擎正確地分析,看來需要修改樣板主題來處理這個問題。
目錄
什麼是「結構化資料標記」?
在一般情況,網頁內容對搜尋引擎來說,只是半結構化的文字片段,並無法進一步分辨網頁包含事件、人物、產品等不同的資料。 為了讓搜尋引擎這類軟體爬蟲可以更好地處理網頁內容,結構化資料(structured data)便是為了這個目的而生。結構化資料標記可以多種格式加入網頁中, 主要有:
在本文,山姆鍋將用到 Microdata 以及 JSON-LD 兩種格式。
文章頁面增加結構化標記
部落格主要的內容就是文章,顯示文章內容的頁面自然是重頭戲。從相關資料可以得知,部落格文章最適合的資料型態(schema)爲 BlogPosting , 而這種資料型態幾個重要的資料元素有:
- 標題 (headline): 使用 ‘headline’ 屬性值標註。
- 發表日期 (published date): 使用 ‘datePublished’ 屬性值標註。
- 特色圖檔 (featured image): 使用 ‘image’ 屬性值標註。
- 內文本體 (article body): 使用 articleBody 屬性值標註。
- 作者 (author): 使用 Person 資料型態標註。
針對文章,山姆鍋採用 Microdata 格式來標記,該格式使用
itemscope, itemtype, 以及
itemprop 元素屬性來標記結構化資料。
底下是 HTML 片段來自樣板(templates/index.html)。
標記文章元素
<article itemscope itemtype="http://schema.org/Article"># 1 . . .</article>在標號 1 使用 itemscope 以及
itemtype 來標記 <article> HTML
元素(element)是一篇文章。
標記文章標題
<header class="page-header">
  <h1>
    <a
      href="{{ SITEURL }}/{{ article.url }}"
      rel="bookmark"
      title="Permalink to {{ article.title|striptags }}"
    >
      <span itemprop="headline">{{ article.title }}</span> # 2
    </a>
  </h1>
</header>
標號 2 使用 itempro="headline"
定義文章的標題(headline)。
標記特色圖檔
使用 itemprop="image" 來標記特色圖檔。
<div class="featured-image">
  <img
    itemprop="image"
    class="article-image img-responsive"
    alt="{{article.title}}"
    src="/media/{{article.image}}"
  />
</div>
標記文章本體
使用 itemprop="articleBody" 來標記文章內文本體(article
body)。
<div itemprop="articleBody">{{ article.content }}</div>標記發布日期
Pelican-bootstrap 3 樣板主題,文章的日期是由
‘templates/includes/article_info.html’
所呈現。下列是其中文章發表日期標記範例:
<span class="published">
  <i class="fa fa-calendar"></i
  ><time itemprop="datePublished" datetime="{{ article.date.isoformat() }}">
    {{ article.locale_date }}</time
  >
</span>
可以看到 itemprop="datePublished" 標記發表日期元素,並配合
‘datetime’ 來提供搜尋引擎可理解的日期。\<time\>\
元素包含的日期格式,可能只適合人類觀看並經過地區化(localization),所以,才需要另外提供一個公搜尋引擎使用的日期格式。
標記作者資訊
作者資訊本身是以另一個資料型態 Person 來標記個別資料,其中重要的資料屬性有:
- 名稱: 顯示用的名稱。
- 頭像 (image): 作者頭像。
- 主要網址 (url): 用來唯一標示這位作者的網址,如個人網站介紹頁面。
- 社群網址: Facebook, Twitter 等社群網站個人專屬的網址。
底下 HTML 片段是來自 ‘templates/includes/custom/authroinfo.html’ 這個樣板檔案:
<div
  class="vcard author author_info"
  itemprop="author"
  itemscope
  itemtype="http://schema.org/Person"
>
  <div class="author_photo pull-left">
    <img
      itemprop="image"
      alt="Sam Kuo (山姆鍋)"
      src="/images/logo.png"
      class="avatar avatar-80 photo img-rounded"
    />
  </div>
  <div class="author-description">
    <h4>
      <a
        class="fn url"
        target="_blank"
        itemprop="url"
        href="{{ SITEURL }}/about/"
        title="由 Sam Kuo (山姆鍋) 發表"
        rel="author"
        ><span itemprop="name">Sam Kuo (山姆鍋)</span></a
      ><br /><small>-- 關注自由軟體發展,探索資訊科技應用 --</small>
    </h4>

    <a
      itemprop="sameAs"
      href="https://github.com/sampot"
      target="_blank"
      class="btn btn-default btn-xs"
      role="button"
      ><span class="fa fa-github-square"></span> GitHub</a
    >
    <a
      itemprop="sameAs"
      href="https://twitter.com/sampotkuo"
      target="_blank"
      class="btn btn-default btn-xs"
      role="button"
      ><span class="fa fa-twitter-square"></span> Twitter</a
    >
    <a
      itemprop="sameAs"
      href="https://tw.linkedin.com/in/sampot"
      target="_blank"
      class="btn btn-default btn-xs"
      role="button"
      ><span class="fa fa-linkedin-square"></span> LinkedIn</a
    >
  </div>
</div>
其中, itemprop="author" 標記這個 <div>
元素包含文章作者的資訊; itemscope itemtype="http://schema.org/Person" 則同時標記它使用
Person 這個資料型態。 針對 Person 資料型態,個別的屬性標記分別為:
itemprop="image": 標記作者頭像。- `itemprop=“name” : 標記作者名稱。
- `itemprop=“url” : 標記作者主要個人資料網址。
itemprop="sameAs": 標記作者其他個人資料網址。
首頁增加網站結構化標記
首頁是放置關於整個網站的結構化資料最適當的網頁,針對網站資料,山姆鍋選擇使用 JSON-LD 格式來標記。 按照 Google 的文件 ⎘ 設定了下面片段在首頁的樣板(index.html)中
<script type="application/ld+json">
  {
    "@context": "http://schema.org",
    "@type": "WebSite",
    "url": "https://samkuo.me/",
    "potentialAction": {
      "@type": "SearchAction",
      "target": "http://samkuo.me/search.html?q={search_term_string}",
      "query-input": "required name=search_term_string"
    }
  }
</script>
第 5 行,需要提供網站的正式網址(canonical
URL),必須與首頁 HTML 標頭中的中繼資料 \<link rel="canonical' href="https://samkuo.me/" /> 設定相同。 第 8 跟第 9
行,目的在設定所謂 Sitelinks Search box
,讓用戶可以直接在搜尋結果進行站內搜尋。此部落格使用 Tipue search 作為
站內搜尋引擎,不知道是否可行,不管怎樣,都是同樣設定。
{search\_term\_string} 是個置換符,代表搜尋的字詞; 與第 9
行的 search_term_string 必須相符。
使用工具檢查
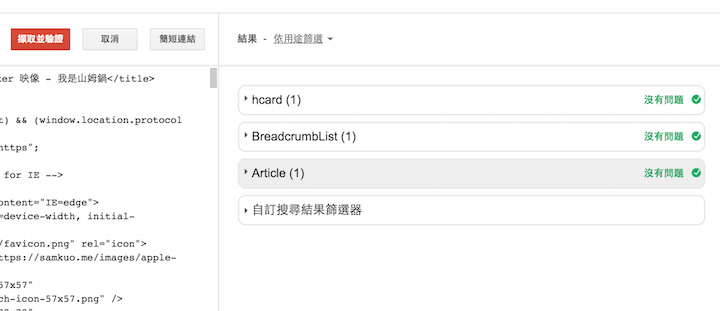
為了確認設定正確,山姆鍋利用 Google 提供的 結構化資料測試工具 ⎘ , 從下面截圖可以看到結果正確。
結語
山姆鍋不知道寫沒有人看的文章有何樂趣,所以讓潛在讀者更容易發現部落格文章,應該是值得做的投資。山姆鍋不是
搜尋引擎最佳化( SEO(Search Engine Optimization){.interpreted-text
role=“abbr”})的專家,本文只是針對「我是山姆鍋」這個部落格所做的嘗試。
參考資料
_`Microdata`: http://schema.org/docs/gs.html#microdata_how ⎘
_`RDFa`: http://www.w3.org/TR/rdfa-lite/ ⎘
_`JSON-LD`: http://www.w3.org/TR/json-ld/ ⎘
_`Sitelinks Search box`: https://developers.google.com/structured-data/slsb-overview ⎘
_`BlogPosting`: http://schema.org/BlogPosting ⎘